How to create synthetic speech continua using STRAIGHT
[TOC]
Overview 
What is STRAIGHT? 
STRAIGHT is a program that analyzes speech, decomposes it into source and filter characteristics, and then recombines it after some manipulation or interpolation.
This tutorial is more of a pratical guide for using STRAIGHT to create various synthetic speech. More detailed information and publications about STRAIGHT are available on the official website .
What is STRAIGHT good for? 
STRAIGHT is best used for creating continua between two naturally-produced endpoints. This allows for holistic morphing between the two, rather than just mixing one part of the sound file, so aspects of coarticulation can be better preserved. Alignment between sound files is both temporal in the waveform and also in the frequency domain, allowing for peaks in the spectra to be shifted around, rather than just mixed linearly.
What is STRAIGHT not good for? 
-
Parametric synthesis
-
Can’t specify formant values
-
Can’t specify values for manipulation precisely (click and drag interface)
-
At least in the GUI (Matlab source has greater control, but less user-friendly)
-
-
-
Articulatory synthesis
-
Transient acoustic event synthesis
-
Waveform gets averaged out, stops don’t have as strong of bursts
-
-
Non-speech synthesis
-
Explicitly assumes source-filter approach
-
STRAIGHT Basics 
Synthesis using STRAIGHT involves analyzing a wav file of naturally produced speech and then resynthsizing a new wav file.
There are three major components involved that are covered in depth:
The workflow that I’ve found works best to do all the analysis of wav files first, save the output of each file (preferrably in a backed up location, i.e. Dropbox folder) before doing any morphing. You can do the analysis to continuum for each recorded end point, but I find this slower overall.
One important thing to note is how dialogs interact with each other. In general, the changes you do in one dialog (i.e., analysis or anchoring) will not be transferred to the main dialog (Morphing Menu, for instance) unless a specific button is pressed (“Set up anchors” or “Finish/Upload” or “Update frequency anchors”). I tend to recommend that the output of each step be saved to a mat file, and then loaded in the main dialog, just so that intermediate steps get saved and so that you’re sure the main dialog has the correct data.
Analysis 
There are three steps to analyze a file, which involve separating a waveform into source and filter characteristics. Source and filter can then be manipulated separately and recombined in the final synthesis.
Analysis can be done either from the MorphingMenu program, or from the TandemSTRAIGHTHandler program. I recommend doing the analysis of all sound files in one big batch through the TandemSTRAIGHTHandler program, save the results as .mat files, and then load those .mat files as needed in the MorphingMenu to create continua.
F0/F0 structure extraction 
This step extracts the voiced source characteristics of the signal, for all voiced segments in a file. To begin extracting the F0 structure, press the “F0/F0 structure extraction” button to open the F0 extraction dialog.
 {: .center-image }
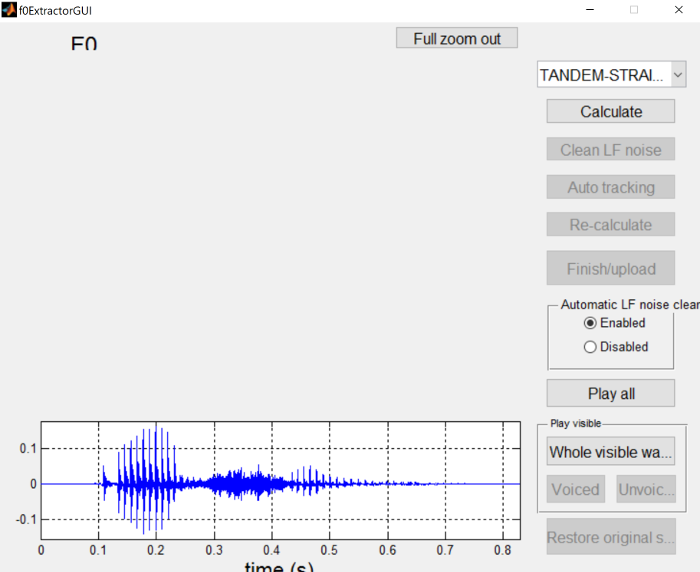
The following screen shot is for the
asi_initialstress.wav
file. You’ll notice in the waveform at the bottom of the dialog that there are two vowel portions, a glottal stop at the
beginning, and an sibiliant between the vowels.
 {: .center-image }
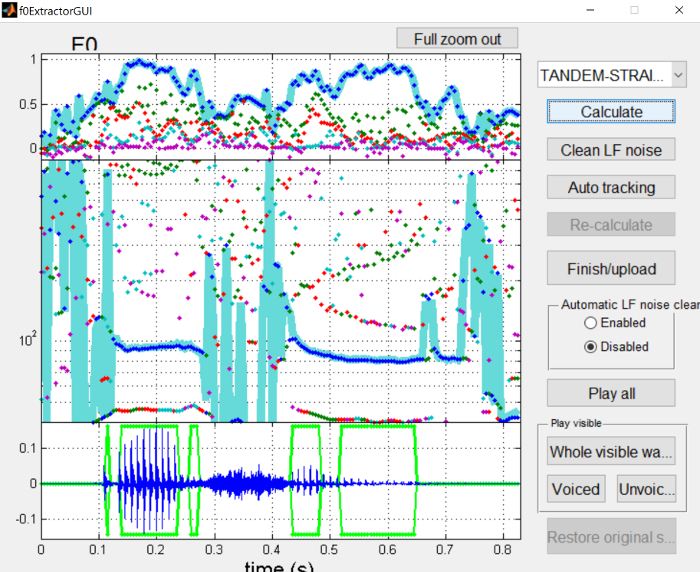
The first step is press the “Calculate” button to generate an initial pitch track and voiced/unvoiced regions of the waveform.
 {: .center-image }
This pitch track is generally pretty good, but clearly has some issues in silent and unvoiced sections. Likewise, there’s a few errors in which frames are voiced versus unvoiced, namely with missing voiced frames in the middle of vowels.
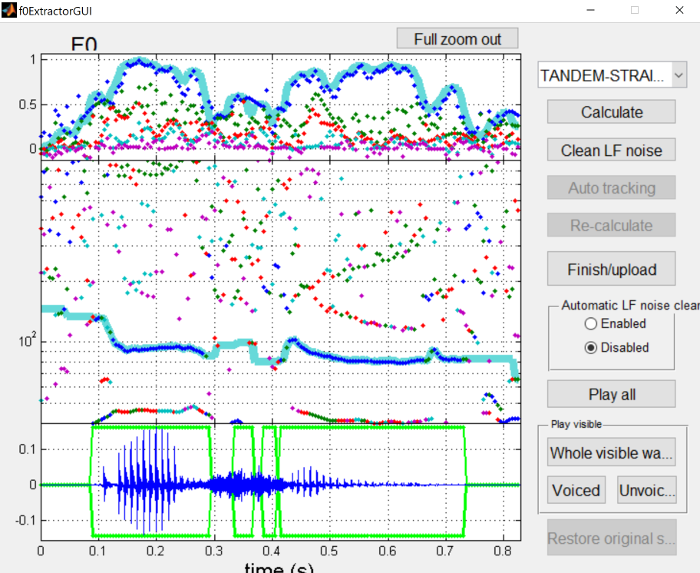
The next step is to apply “Auto tracking” to clean up the pitch track.
 {: .center-image }
The pitch contour is now much cleaner, and the missing voiced frames in the middle of vowels are now there. However, extra voiced frames are now present in the middle of the sibilant, which should be corrected manually.
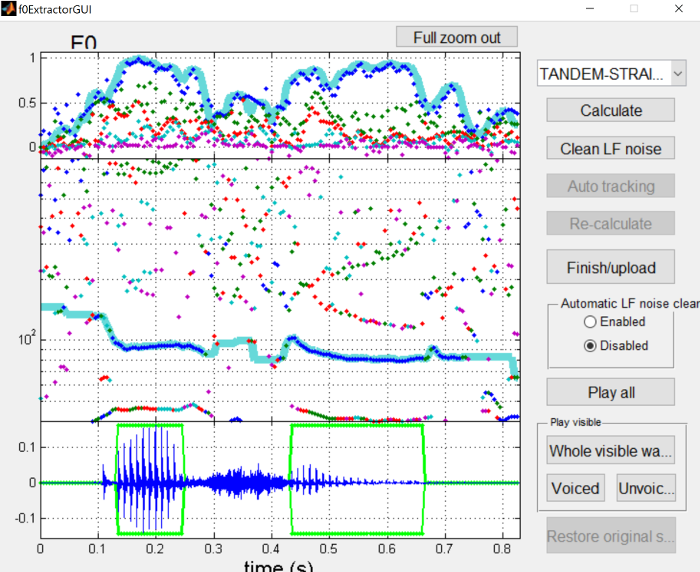
To change voicing regions, you can click the edge of a voiced region and drag it around. To delete these regions, I find it easiest to drag one of the voiced regions from the vowel over the erroneous regions, and then drag it back to where it should be. You can also click the right side of a voiced interval, and drag it all the way to the left side of it, which will remove it as well. Also, refer to the F0 extraction interface page for more information about interacting with the dialog.
 {: .center-image }
Once you’re happy with the voiced/unvoiced parts of the file, press the “Finish/upload” button to send what you’ve done back to the main analysis window.
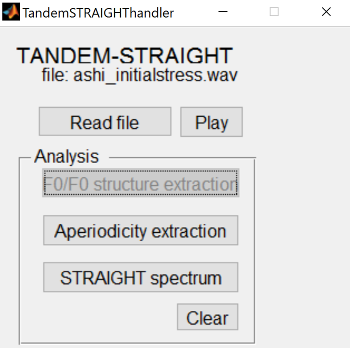
Aperiodicity extraction 
Aperiodic portions of the signal are extracted and analyzed. Aperiodic portions are usually obstruents, but it can also (unintentionally) model noise in the recording.
 {: .center-image }
This is simple from the user’s point of view, no extra dialog is opened or extra input needed.
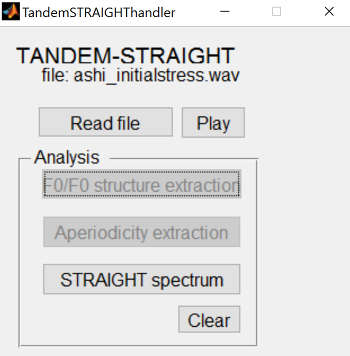
STRAIGHT spectrum 
This step extracts the filter characteristics of the signal. This is similar to an LPC spectrum or a power spectrum lacking source information like harmonics or noise sources.
 {: .center-image }
Like the aperiodicity extraction, no extra dialog is opened when calculating the spectrum.
Once a waveform has been fully analyzed, it is ready to be manipulated and resynthesized or morphed with another analyzed sound file to create a continuum.
The most common use case is to create a continuum via morphing.
Morphing 
The most common way to use STRAIGHT in speech perception experiments is to morph between two similar sound files that differ in a key way.
In this page, we’ll morph between asi (
/'ɑsi/
) and ashi (
/'ɑʃi/
) with stress on the initial
syllable. The wav files are
asi_initialstress.wav
and
ashi_initialstress.wav
, and the pre-analyzed
mat files are
StrObjasi_initialstress.mat
and
StrObjashi_initialstress.mat
.
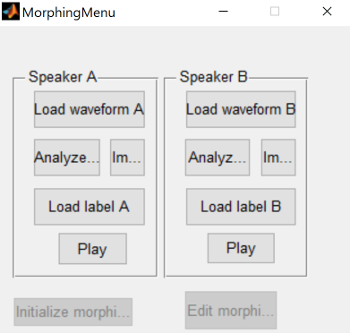
Load these files into the morphing menu, either as the mat files, or analyze the wav files.
 {: .center-image }
There are three steps to creating a continuum:
Alignment of the two files 
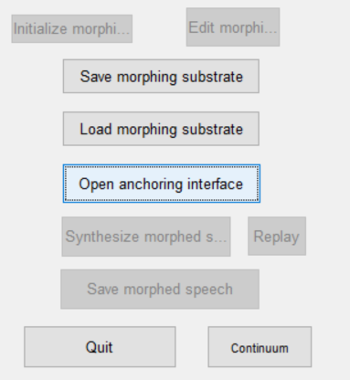
To begin with, once the sound files are loaded and analyzed, press the “Open anchoring interface” button to specify the alignment between the two. For details on how to perform various actions in the anchoring interface, please see here .
 {: .center-image }
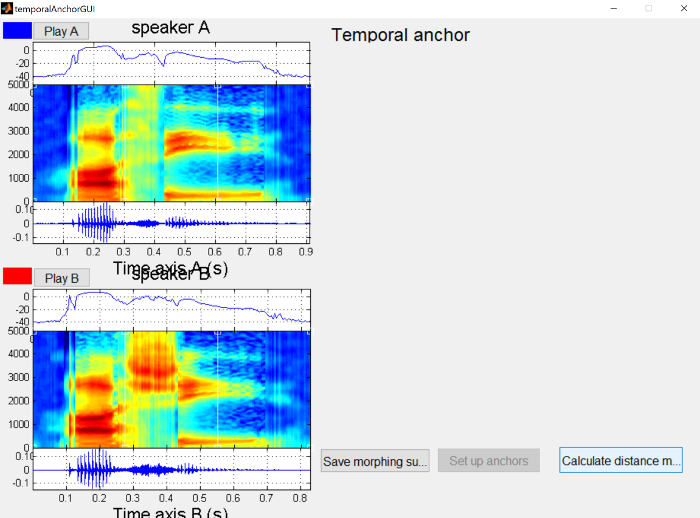
This will open a window with the two waveforms and spectrograms (asi on top as “Speaker A” and ashi on bottom as “Speaker B”).
 {: .center-image }
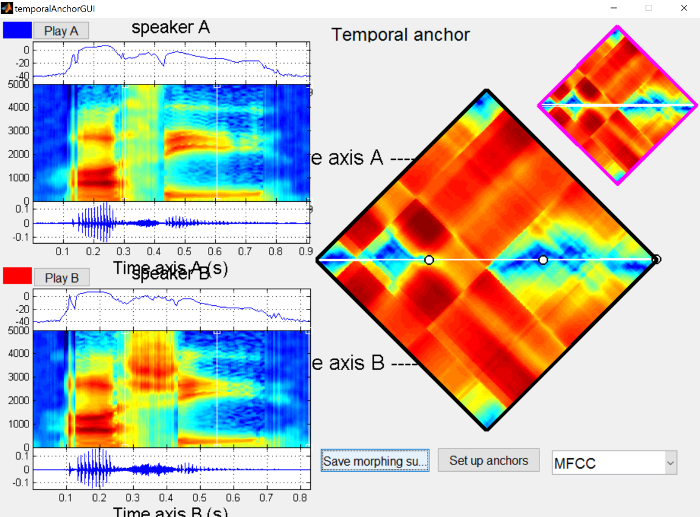
Next, click on the “Calculate distance matrix” button, which will compare each frame of audio from one file to each frame in the other.
In the distance matrix on the right side, dark blue represents small distances (very similar frames of audio) and dark red represents large distances (very different frames of audio). In general, you’ll notice stripe or checkboard patterns, and the boundaries of these stripes correspond roughly to segment boundaries.
 {: .center-image }
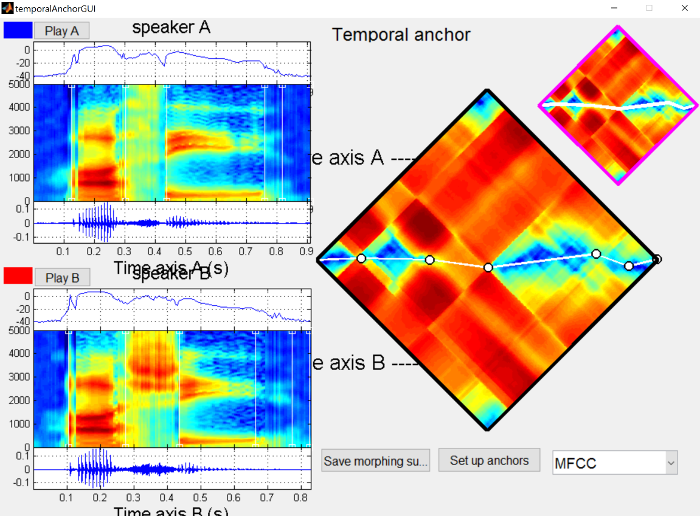
The initial alignment is the straight line across the two files. In general, this should be pretty close to the path we’ll eventually choose, because we want the sound files we’re morphing to be as similar as possible. In this case, I’ve produced the sounds with the same stress pattern and similar timings, though /s/ in general tends to be longer than /ʃ/.
The temporal anchors should be placed such that they line up to points in the sound file that have the same “meaning” in both files. So minimally there should be an anchor for the onset of the /ɑ/, the boundary between the /ɑ/ and the sibilant, the boundary between the sibilant and the /i/, and the offset of the /i/.
 {: .center-image }
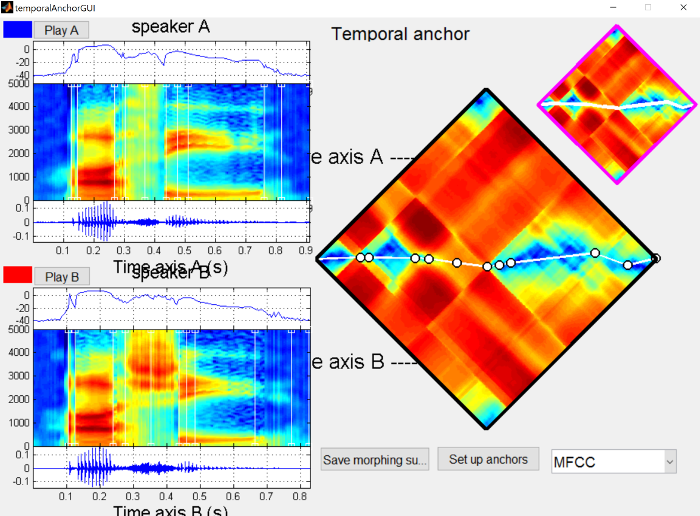
We also want to make sure that there are frequency anchors for the sibilant and the formant transitions, to make those more natural. Without frequency anchors, any differences will be mixed linearly in the frequency domain, similar to what you would get if you made the stimuli in Praat by extracting the /s/ and /ʃ/ and mixing them at different percentages. Instead we can shift the spectral peak around in STRAIGHT. The differences between mixing and shifting are not super pronounced when synthesizing sibilant continua, but make a huge difference in synthesizing vowel continua (shifting formants around).
 {: .center-image }
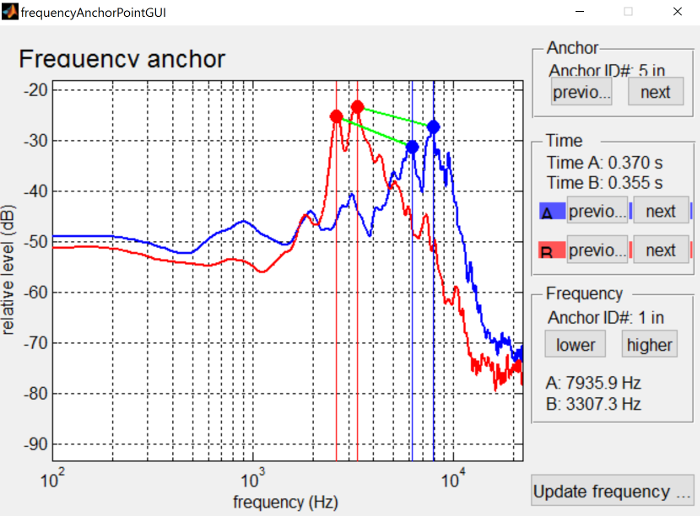
Once you have an anchor in the middle of the sound to be morphed, we want to anchor the peaks in the frequency domain. To do so, hold alt and click on the point in the center of the sibilants (the cursor will turn to a pointing hand over the anchor). This will bring up a display of the spectra for the two wave files at that point in time.
 {: .center-image }
In this case we’ve aligned the peaks of the sibilants, so that they’ll get shifted around when morphing, rather than averaged. See the interface controls page for more details on how to interact with frequency anchors.
Once you’re happy with the frequency anchors, press the “Update frequency anchors” button in the lower right of the window, and that will save what you have anchored and pass it back to the main anchoring dialog.
Once all the anchors are set up to your satisfaction, you can press the “Set up anchors” button to send the work back to the main morphing dialog. I also recommend saving the anchors via the “Save morphing substrate” button, like the asi-ashi_initialstress.mat file.
Setting up morphing rate 
Once anchoring is finished, or the morphing substrate mat file from a previous session is loaded, you’ll have to set up the two end points of the continuum you want to generate.
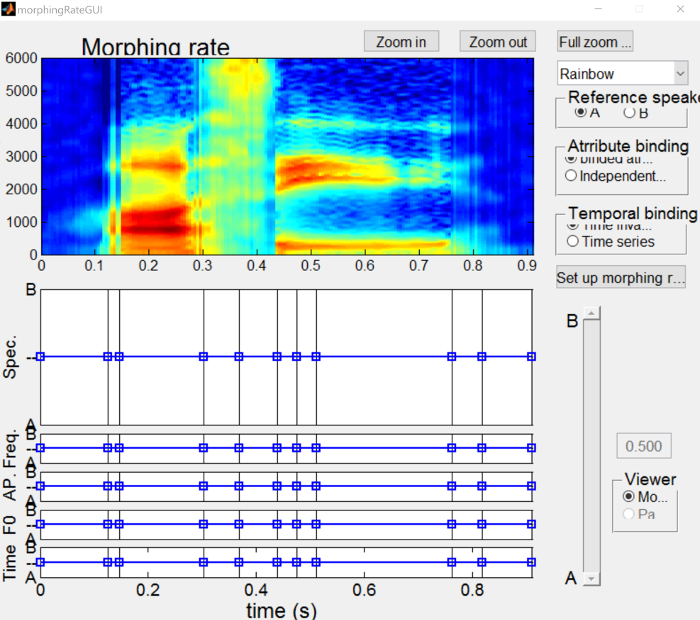
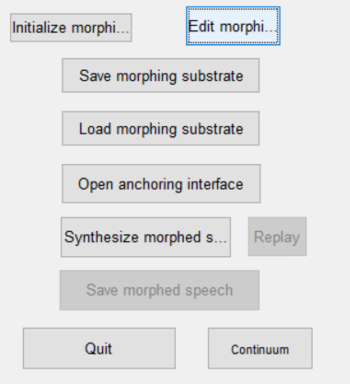
To do so, first press the “Initialize morphing rate” button and then the “Edit morphing rate” button, which will open the morphing rate dialog.
 {: .center-image }
In the dialog window, there are a lot of options for what can be done. For the continuum we’re creating, we’re going to be ignoring most everything here, but see the morphing rate interface page for more details on what aspects of it do.
 {: .center-image }
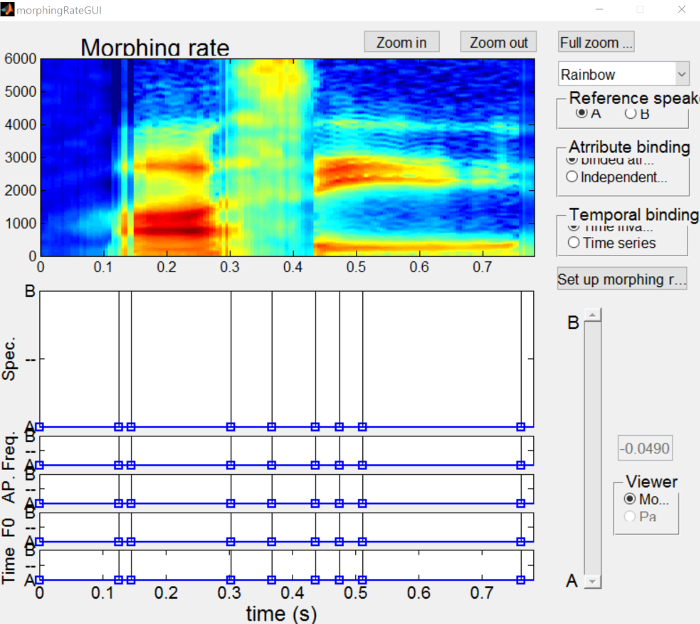
What we want to do is create a substrate that is wholly “A” (i.e. asi) and another substrate that is wholly “B” (i.e. ashi). To do so, click on one of the points in the “Spec” figure (the blue boxes and lines should turn green) and drag it all the way up to the “A” side.
 {: .center-image }
Once that’s done, press the “Set up morphing rate” button on the right to send it back to the main dialog. Click the “Save morphing substrate” button to save the A subtrate as a mat file, like asi-ashi_initialstress_A.mat .
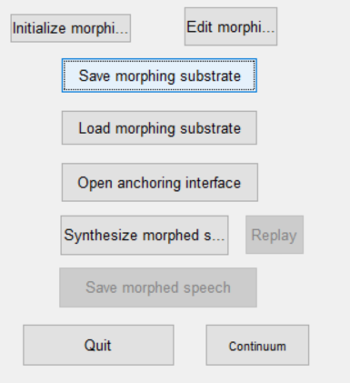 {: .center-image }
Once the A substrate is saved, we’ll make the B substrate by clicking the “Edit morphing rate” button, and then clicking and dragging a point in the “Spec” figure (along with all the rest of the points) all the way to the B side.
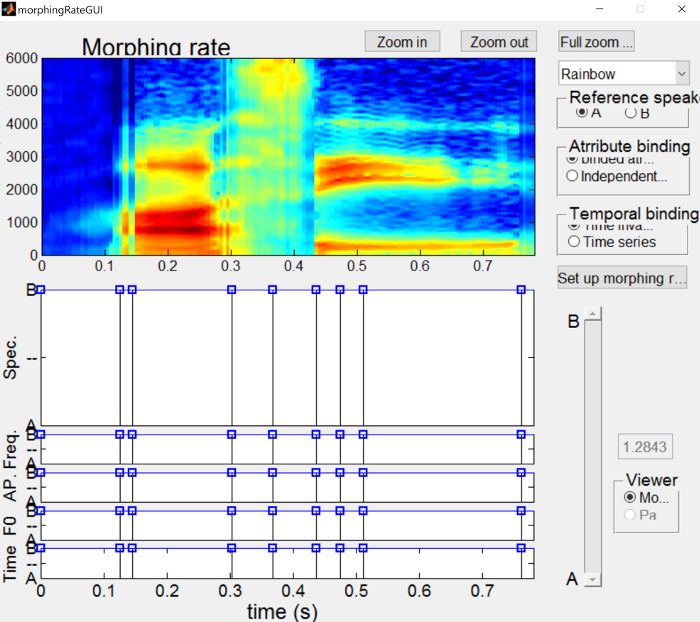 {: .center-image }
Once more, click the “Set up morphing rate” button to send it back to the main morphing window, and then click the “Save morphing substrate” button to save the B subtrate as a mat file, like asi-ashi_initialstress_B.mat .
Generating the continuum 
Once the end points of the continuum are all set up, we’re ready to generate the steps. From the main morphing menu, click the “Continuum” button at the bottom right of the menu.
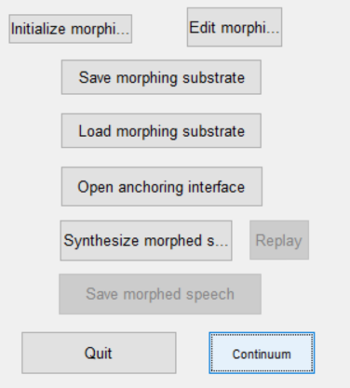 {: .center-image }
This brings up a dialog to generate the continuum. You can edit where the continuum will be save here, but I find it easier just to use the defaults and move the continuum to a backed up location once you’re happy with the results. You might have to go back and edit the anchors a couple of times and STRAIGHT is not good about remembering paths you’ve entered before. You can also change the number of the steps that will be generated if you want more or less than the default 11. I do recommend changing the file name root to something more informative than “stimulus”, in this case I used “asi-ashi_initialstress”.
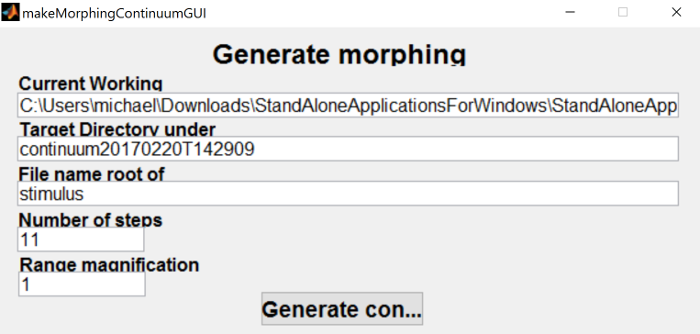 {: .center-image }
When you click the “Generate continuum” button, it will prompt you to find the A substrate mat file that we saved earlier, followed by the B substrate mat file. Once both have been selected, it will generate the continuum (and play them on top of each other). To actually get a sense of how well they turned out, I would recommend opening them in Praat and playing around with them there. The continuum steps that I’ve generated is below.
|
Step |
File |
Step |
File |
Step |
File |
|---|---|---|---|---|---|
|
1 |
2 |
3 |
|||
|
4 |
5 |
6 |
|||
|
7 |
8 |
9 |
|||
|
10 |
11 |
|
|
I’ve written a batch script in Matlab for generating lots of continua given a folder with *A.mat and corresponding *B.mat substrates. If you’re generating a lot of continua, this might be faster and more flexible than using the dialog for each one. The script is available here
Manipulation 
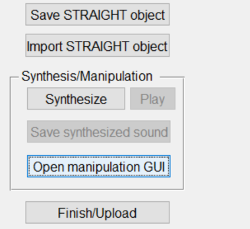
The manipulation dialog is accessed through the TandemSTRAIGHTHandler program, rather than the morphing menu. Near the bottom after analyzing a sound file or loading a pre-analyzed sound file, you can click the “Open manipulation GUI” to manipulate a given sound file.
 {: .center-image }
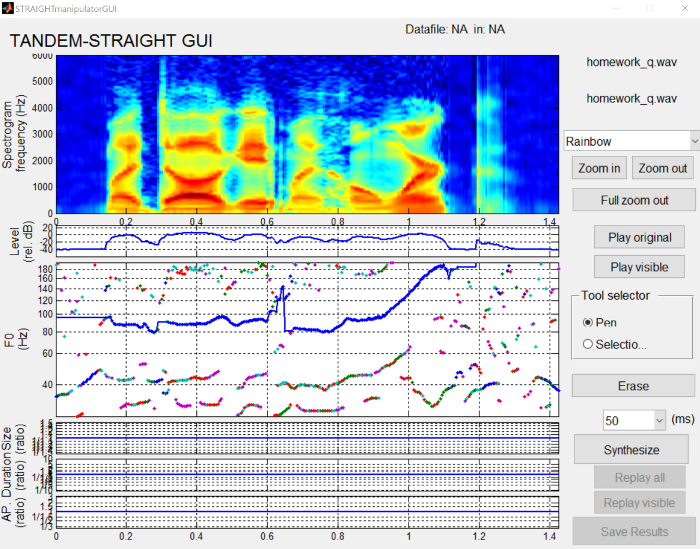
When you load into the dialog, it shows you the spectrogram along with figures for intensity, F0, size ratio, duration ratio, and AP ratio.
 {: .center-image }
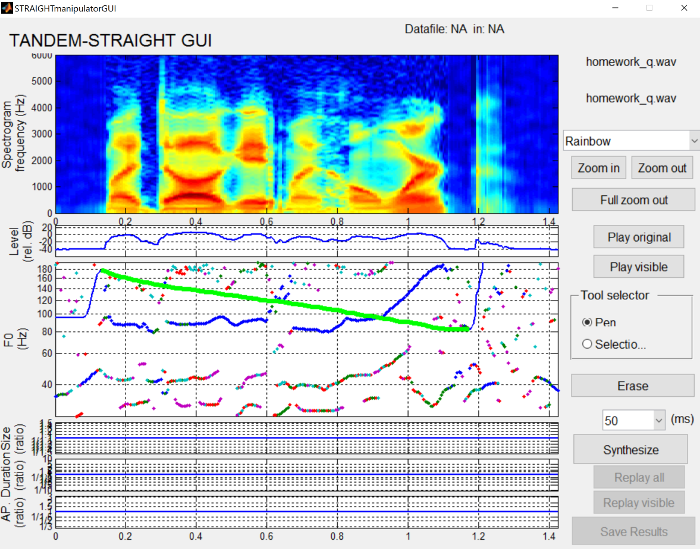
From here you can use the pen tool to draw contours and patterns for something like F0 or intensity.
 {: .center-image }
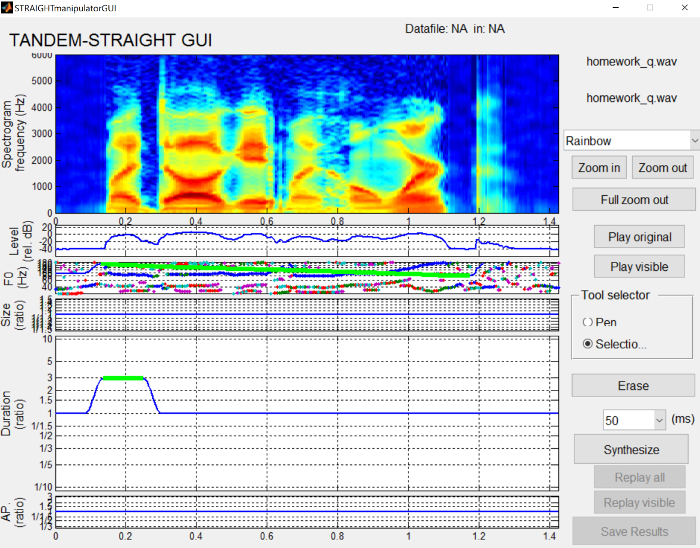
You can also use a rectangle selector (selected via the radio buttons on the right side of the interface. If you want to make the first word longer by some amount, you can select all the points and then raise their duration ratio.
 {: .center-image }
To generate the synthesized wave file, press the “Synthesize” button to hear what the current manipulation sounds like. When you’re happy with the synthesis, press the “Save results” button to save a .mat file and a wav file. The save box makes it seems like only a .mat file will be saved, but a wav file with the same name will be saved in the same place.
Examples 
This section contains a number of examples demonstrating the use of STRAIGHT to generate continua between end points, or resynthesize a single file.
-
Sibilant continua
-
Similar to the walkthrough
-
More endpoint examples
-
-
Stress shift continua
-
/’ɑsi/ to /ɑ’si/
-
/’ɑʃi/ to /ɑ’ʃi/
-
-
Stop voicing continua
-
“task” /tæsk/ to “dask” /dæsk/
-
-
Vowel continua
-
“bit” /bɪt/ to “bat” /bæt/
-
Other bVt words to play around with
-
-
Intonation continua
-
“My dog ate my homework.” (declaritive) to “My dog ate my homework?” (yes-no)
-
-
Pitch manipulation
-
“My dog ate my homework?” to user-specified declaritive intonation
-
Synthesizing a sibilant continuum 
This kind of continuum is covered in depth in the morphing tutorial .
If you would like to synthesize other similar continua, I have the following wav/mat files available:
The _bad versions are cases where I produced the word with final stress, but with a fairly reduced /ɑ/. The morphing of those would be one instance where it would probably be better to rerecord rather than morph as is, but are provided as examples for teaching.
Synthesizing a stress shift continuum 
The continuum for stress shift can be generated using the same files as the sibilant continua, because each token was produced with stress either on the initial syllable or the final syllable.
In this example, we’ll be morphing asi_initialstress.wav to asi_finalstress.wav.
Below you’ll see the temporal anchors for the morphing. You’ll notice that there are relatively large deviations in opposite directions of a straight line across for where the stressed syllable is, due to duration being a large cue to stress in English.
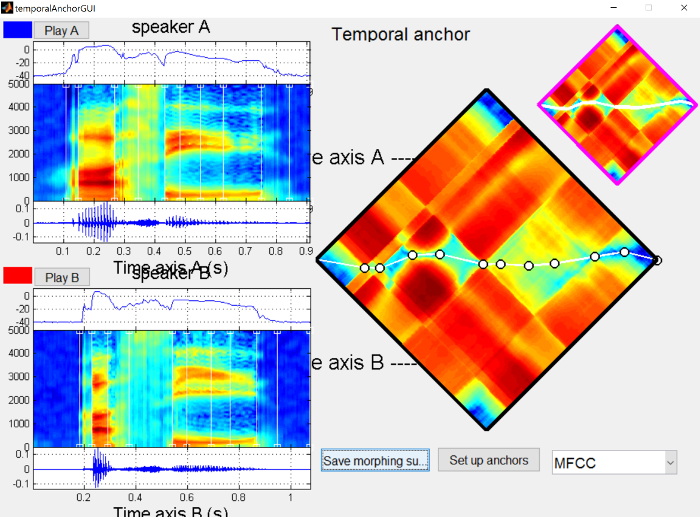 {: .center-image }
There is also some spectral differences in the second syllable, due to the effect of stress. As such, we’d like to make sure that formants are properly aligned during the second syllable as below.
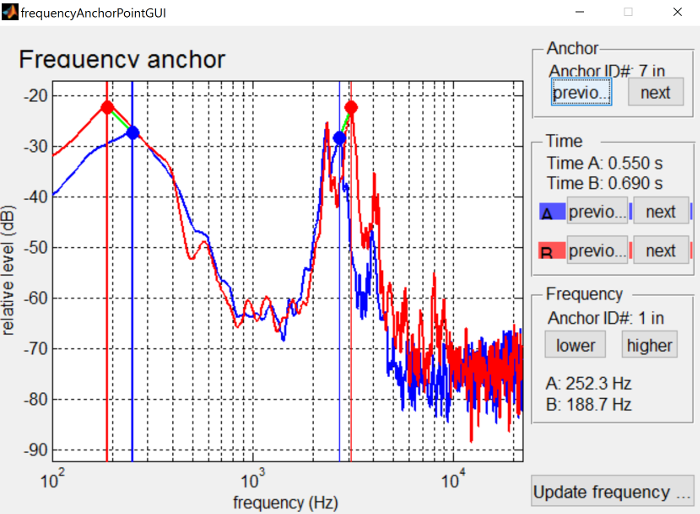 {: .center-image }
Below you’ll find the full morphed continuum from initial to final stress on “asi”.
|
Step |
File |
Step |
File |
Step |
File |
|---|---|---|---|---|---|
|
1 |
2 |
3 |
|||
|
4 |
5 |
6 |
|||
|
7 |
8 |
9 |
|||
|
10 |
11 |
|
|
Synthesizing a voicing continuum 
This page focuses on making a continuum between “task” and “dask”. Below you’ll find the wav files used, as well as a prevoiced version of “dask”, for if you’d like to play around with it.
You’ll see below the temporal anchors for the morphing substrate. The main focus of the anchors is around when the burst and aspiration occur, so anchors have been placed at various points: before the burst, after the burst, when voicing begins, and when formant transitions are complete.
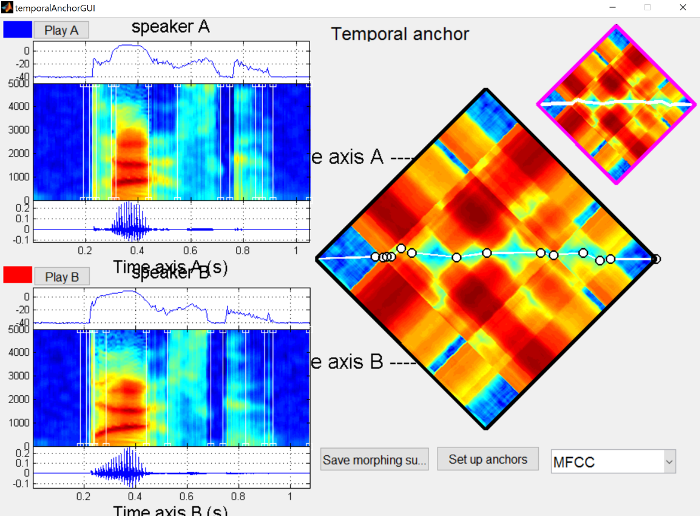 {: .center-image }
It could be argued that rather than placing a boundary where voicing begins, that boundary should be placed relative to the formant transitions. In “dask”, that aligns with voicing, but in “task” formant transitions begin during the aspiration. This would result in a continua centered around the source going from aperiodic to periodic, rather than the duration of the aperiodic aspiration. I’m going to leave this as a task to you if you’re interested in comparing the resulting continua. It should be less natural, because the amplitude of prevoicing would weaken as the VOT gets shorter, which doesn’t make sense from an articulatory standpoint. A potentially better way would be to create two continua next to one another, one from aspirated to unaspirated and then from unaspirated to prevoiced.
Below you’ll find the full morphed continuum from aspirated “task” to unaspirated “dask”.
|
Step |
File |
Step |
File |
Step |
File |
|---|---|---|---|---|---|
|
1 |
2 |
3 |
|||
|
4 |
5 |
6 |
|||
|
7 |
8 |
9 |
|||
|
10 |
11 |
|
|
One thing to note, is that due to the way STRAIGHT does its synthesis, quick transients like stop bursts can get weakened compared to their original form. If we look at the natural stop burst for “task”, we see that it is higher in amplitude than the following aspiration.
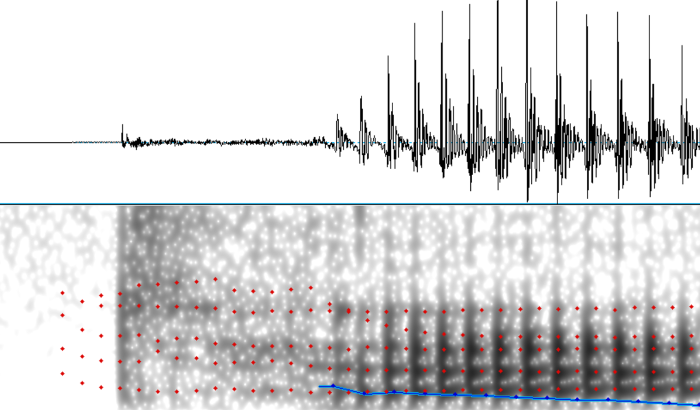 {: .center-image }
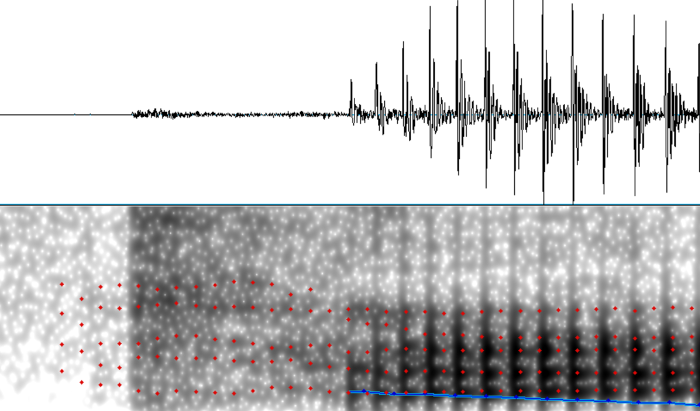
However, the same cannot be said for the synthesized version, where the burst amplitude has been reduced and is comparable to the aspiration amplitude.
 {: .center-image }
In general, while STRAIGHT excels at modelling continous sources like voicing and turbulence, it’s not as good at modelling transient sources like bursts.
Synthesizing a vowel continuum 
This page will focus on making a continuum between “bit” and “bat”, primarily to illustrate the benefits of frequency anchoring. However, I have many /bVt/ words recorded that can be used as end points for many different continua around the English vowel space:
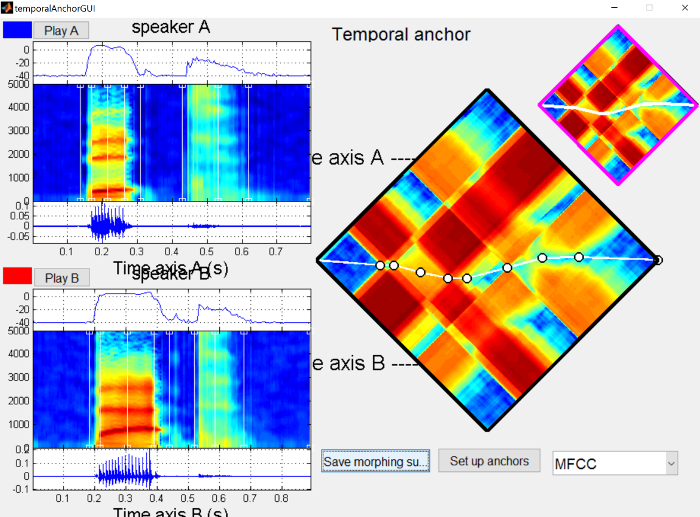
The temporal structure for creating a continuum follows that in the morphing tutorial .
 {: .center-image }
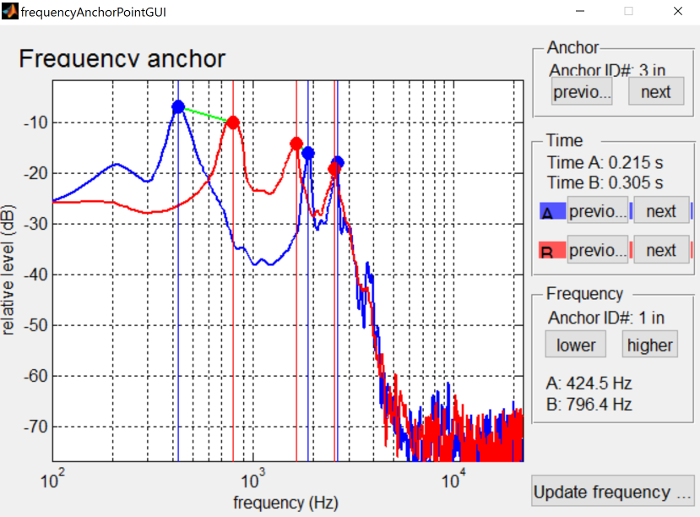
You’ll notice that the region corresponding to the vowel in each sound files shows a fair bit of difference, indicative of their different formant structure. Rather than mixing the sound files directly, we’d like to shift the formants around, so we have to align the formant peaks during the vowel as below.
 {: .center-image }
The continuum created for the “bit” and “bat” endpoints using morphing substrates of bit-bat_A.mat to bit-bat_B is below.
|
Step |
File |
Step |
File |
Step |
File |
|---|---|---|---|---|---|
|
1 |
2 |
3 |
|||
|
4 |
5 |
6 |
|||
|
7 |
8 |
9 |
|||
|
10 |
11 |
|
|
Listen specifically to steps 6 and 7 to hear something approximately “bet”-like, as the continuum goes through the /ɛ/ formant region.
In contrast, a continuum created without frequency anchoring sounds using morphing substrates of bit-bat_nofreqeuencyalignment_A.mat to bit-bat_B is below.
|
Step |
File |
Step |
File |
Step |
File |
|---|---|---|---|---|---|
|
1 |
2 |
3 |
|||
|
4 |
5 |
6 |
|||
|
7 |
8 |
9 |
|||
|
10 |
11 |
|
|
The boundary between the two is much more abrupt and the synthesis quality is generally not as good.
Synthesizing an intonation continuum 
This example uses the following sound files:
-
-
“My dog ate my homework.” (declarative intonation)
-
-
“My dog ate my homework?” (yes-no question intonation)
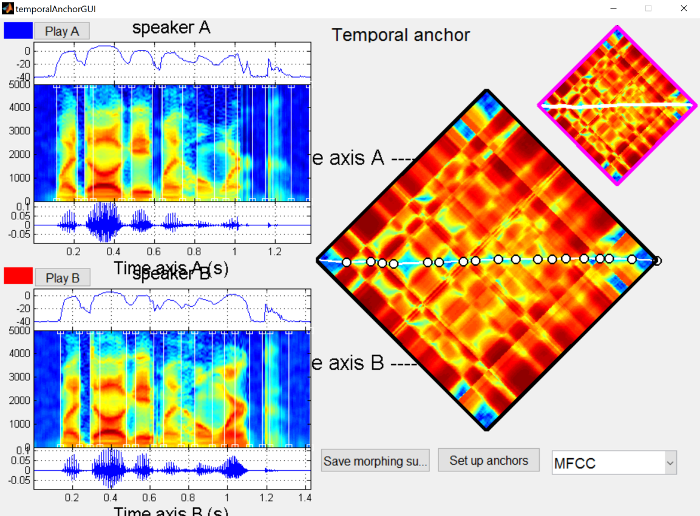
The temporal structure for creating a continuum follows that in the morphing tutorial .
 {: .center-image }
There’s a fair bit of spectral difference in the final word (“homework”) which is to be expected given that I tend to use creaky voice more at the end of the sentence, so it might be worthwhile re-recording this pair. However, the continuum generally sounds pretty good to me.
The continuum created for the “homework_s” and “homework_q” endpoints using morphing substrates of s-q_homework_A.mat to s-q_homework_B is below.
|
Step |
File |
Step |
File |
Step |
File |
|---|---|---|---|---|---|
|
1 |
2 |
3 |
|||
|
4 |
5 |
6 |
|||
|
7 |
8 |
9 |
|||
|
10 |
11 |
|
|
Pitch manipulation 
This example uses the following sound file:
-
-
“My dog ate my homework?” (yes-no question intonation)
The resynthesized version is the result of drawing the downward trending line from the manipulation page .
The original pitch curve is shown below.
 {: .center-image }
By drawing a line going down over the course of the sentence, we can change the question intontation into a (slightly unnatural sounding) declarative intonation.
 {: .center-image }
Interface controls 
This section contains information on the less obvious ways over interacting with the various dialogs that STRAIGHT uses.
F0 extraction interface controls 
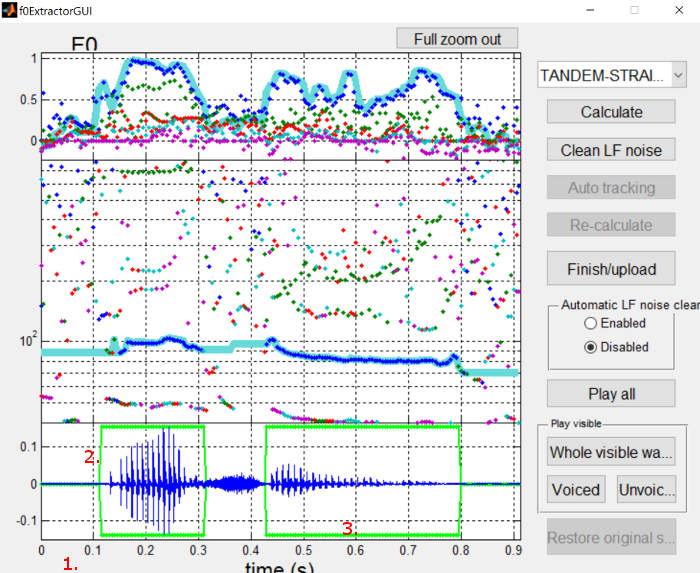 {: .center-image }
-
Click on the time axis to zoom in
-
Hold shift and click to zoom out
-
Click and drag to move the visible part of the waveform
-
-
Click and drag a boundary to extend/reduce a voiced portion
-
Moving a boundary over another voiced portion will overwrite it, which can help with deleting lots of small voiced portions
-
-
Click and drag a point to mark a frame as either unvoiced or voiced
-
Drag to the center to mark as unvoiced
-
Drag to top or bottom to mark as voiced
-
Anchoring interface controls 
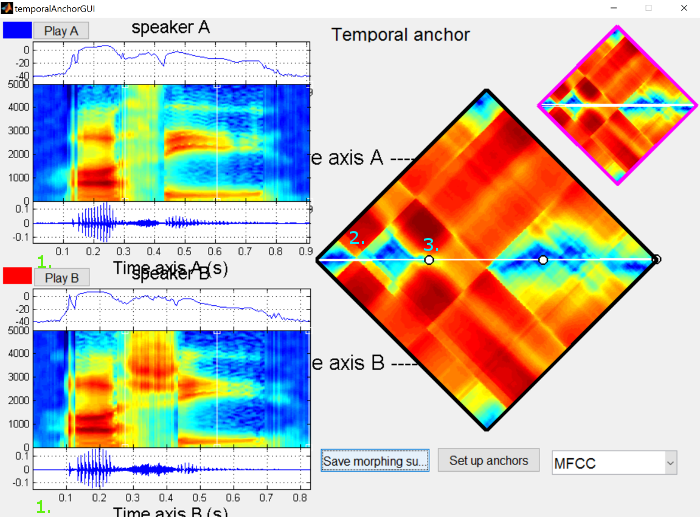 {: .center-image }
-
Click on the time axis of either sound file to zoom in
-
Hold shift and click on the time axis of either to zoom out
-
When zoomed in, you can click and drag the spectrograms, waveforms or distance matrix to move the visible areas
-
-
Click on the white alignment line across the distance matrix to add a new anchor
-
Mouse cursor will change to have a plus
-
-
Click and drag on an anchor to move it around (you can also click and drag the lines in the spectrogram view)
-
Hold shift and click to remove an anchor
-
Mouse cursor will change to an eraser
-
-
Hold alt and click to bring up the frequency anchor interface
-
Mouse cursor will change to a pointing hand
-
-
Frequency anchor interface controls 
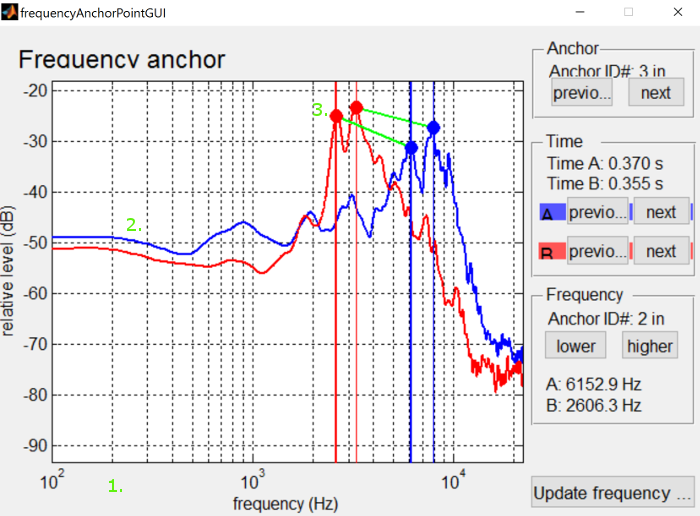 {: .center-image }
-
Click on the frequency axis to zoom in
-
Hold shift and click to zoom out
-
Click and drag the white background to move the visible part of the spectrum
-
-
Click on either frequency spectrum to add an anchor
-
Mouse cursor will change to have a plus
-
-
Click and drag on the dots to change what parts of the spectrum are aligned
-
Hold shift and click to remove an anchor
-
Mouse cursor will change to an eraser
-
-
Graphical elements can interfere with one another, so you may have to move something out of the way first
-
Troubleshooting STRAIGHT 
Recording quality 
The source end points should be recorded in as high a quality as possible with a high SNR. STRAIGHT scales the amplitudes, so if your stimuli were recorded with a lower gain, some noise might be introduced from the microphone, leading to artifacts in the eventual synthesis.
Additionally, the recording environment should not have noise in the background. STRAIGHT can remove some low frequency hums, but any noise in the frequency range of speech is going to be analyzed as speech and resynthesized.
Pronunciations 
The two end points that you’re generating a continuum for should be maximally similar, except in the one way you want the continuum along. So for a continuum from “bet” to “bat”, the /b/ and /t/ should be pronounced as identically as possible. In English, /b/ can be realized (albeit uncommonly) with prevoicing, and coda /t/ can be realized in a variety of different ways: released, unreleased, glottalized released, or glottal stop. If the two end points have different realizations, generating a continuum is much trickier (you can look at using bet_creaky.wav and bat.wav as the end points). In this case, I would recommend re-recording the end points to be more similar. Side-by-side productions can be used to elicit more similar pronunciations, as well as coaching the speaker about releasing all stops, for instance.
I would also recommend consistent modal voice quality, since pitch tracking is generally easier.
Random error in generating continua 
I’ve run into a random error that sometimes pops up on some versions of the Matlab code, where it will give a message about different dimensions of matrices. The fastest solution I’ve found is to redo the anchoring completely, and then run the continuum again and it should work. I think this is only relevant to the batch script that I’ve wrote here , I don’t think I’ve encountered the bug in the standalone versions.